The on-board computer for Lanos is a practical device for the central panel!
An on-board computer is a luxury for budget cars. These cars include the recently popular Chevrolet Lanos model with a 1.5 engine in the CIS countries. The on-board computer is a convenient and practical device that can be used to control various engine parameters, etc. In this article, we will look at the process of installing a BC on this model and help you make the right choice.
1 Variants of on-board devices for Chevrolet Lanos
This model was produced until 2008, the engine class complies with Euro-2 standards and is equipped with a simple three-modification control unit (IEFI-6 and ITMS6F), capable of working synchronously with some computer models of the region. The most popular versions of such devices for Lanos are the Cyclone BC models and some modifications produced by Multitronics. These devices mount to the windshield, panel or DIN location.
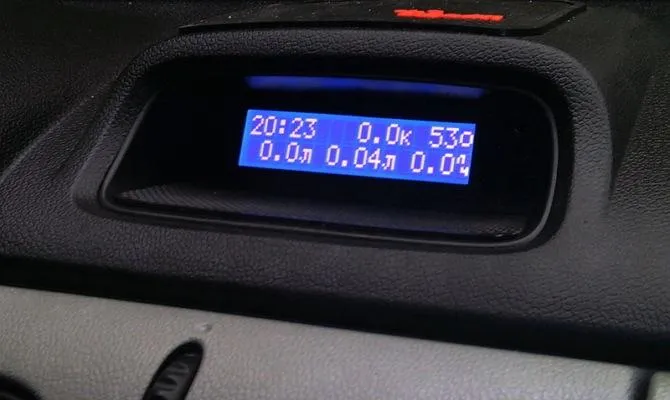
BC “Cyclone” for Lanos The on-board computer “Cyclone” is installed in the standard position, in which the car clock is located. It has a simple structure and functions, and is a complete on-board computer with functions such as:
- current mileage indicator;
- indicator of average and instantaneous fuel consumption;
- notification of exceeding the permissible speed and battery charge;
- engine speed indicator;
- clock, date, alarm and timer;
- the ability to read ECU fault codes;
- average speed measurement and cost-based fuel calculation;
- temperature measurement in the passenger compartment and outside the car.
In addition to the functions presented, this model of the on-board computer has the ability to adjust the brightness and contrast, as well as the color of the display and a powerful sound alert. It belongs to the type of cheap on-board computers – the price of the device from different dealers does not exceed 3000-3500 thousand conventional units. The kit includes the necessary parts and installation instructions in place of the standard clock on the center panel under the air vents. In the case of the Chevrolet Lanos model, the connection is made to the diagnostic connector on the dashboard and the dimensions of the device ideally match the clock hole.

Diagnostic connector on the instrument panel
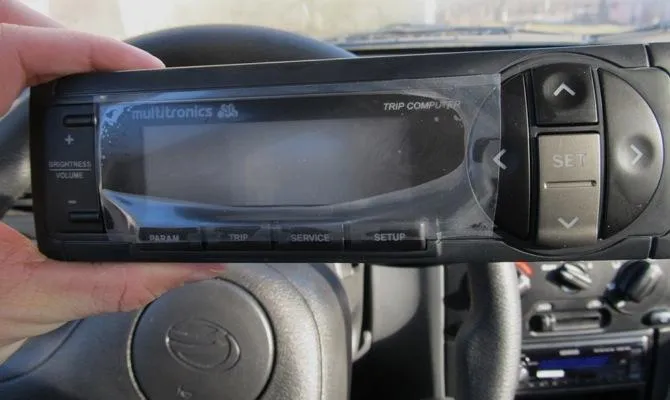
Another popular and well-established computer model for the Chevrolet Lanos is the modification of the Multitronics SL-50V or RC-700. These models are panel mounted under the radio and have a larger capacity than the Cyclone version. They support most diagnostic protocols for domestic cars and are universal. Among the advantages are the following:
- the ability to view the graph of instantaneous parameters;
- the ability to connect up to two parking radars;
- notification of dimensions without switched on or low beam;
- control of injection duration and fuel quality;
- reading and troubleshooting the engine ECU.
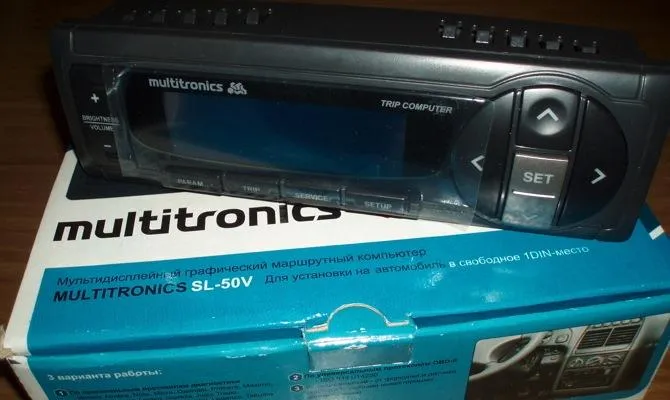
Multitronics SL-50V device In addition, when an additional cable is connected, this on-board computer can also work as an oscilloscope, which allows further and more detailed diagnosis of malfunctions of various components of a Chevrolet Lanos car. The cost of such a computer is about 5 thousand conventional units.
2 Do-it-yourself installation of the on-board computer Multitroniks SL-50V
Before proceeding with the installation of the on-board computer, be sure to remove the negative terminal from the battery, turn off the ignition of your car.
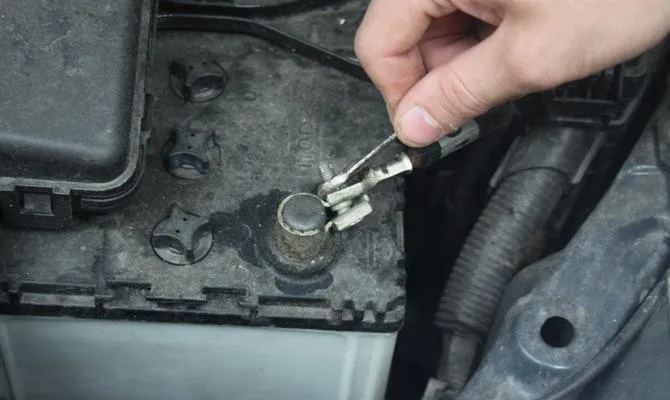
Removing the negative terminal from the car battery Next, you need to remove the radio panel or the entire radio tape recorder – this will make the installation process more convenient. Now that nothing is blocking the installation, use a flat head screwdriver to pry up the center console trim and remove it. It is supported by four clips (two at the top and two at the bottom). Be careful when removing, as the plastic clips are very fragile and it is not easy to find such parts of the new shape.
Next, we unscrew the “pocket” panel, to which two self-tapping screws are attached, and cup holders (also 2 self-tapping screws that must be unscrewed). Therefore, everything under the air conditioning and temperature control buttons must be removed from the panel.
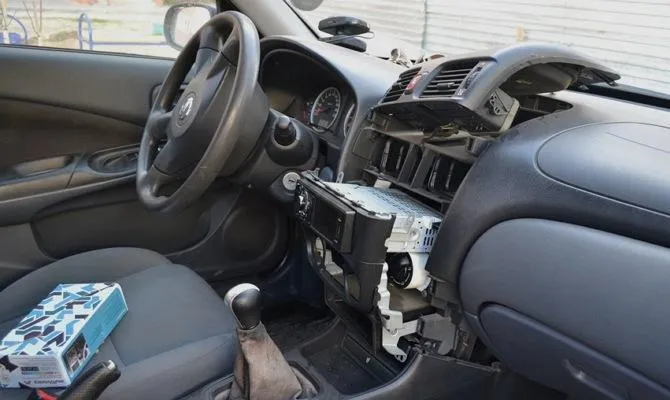
Dismantling the “pocket” of the dashboard. There are two types of diagnostic pads on Chevrolet Lanos: OBD2 for 16 pins and OBD1 or GM12 for 12 pins. If your car has pads of the first type, then you are lucky and to connect a computer, you just need to connect the contacts according to the instructions diagram. In the second case, you need to look under the panel on the right side of the driver's feet – there is a GM12 block. It will supply power to the on-board computer.
3 Nuances when connecting electrical wiring
To access the wiring blocks, it is necessary to remove the plastic cover (unscrew the plastic fixing screw on the left side at the driver's feet). For added convenience, you can also remove the side cover on the left side of the panel – it is fixed with latches. Next, you will need the adapter block that comes with the onboard unit. The positive power wire of the BC is connected to the plus on the diagnostic unit, the common wire to the common contact of the unit, the “K-Line” to the standard white wire. Next, the wires are insulated and laid under the casing until the pads exit on the left.
Connecting the on-board computer Multitronics Now you need to remove the headlight range control panel: it is attached to the retainer. Next, you need to connect the wiring:
- brown wire from the BC to the headlight corrector block to the white wire (there are two of them, for convenience you can call the tester);
- the fuel level sensor (brown wire) is connected to the standard connector C206 (the largest in the block, white), which is located next to the fuse box behind the overlay on the left side at the driver's feet. The wire connects to the 19th pin (white-black), and you can use the connection through the connector, but this is not necessary;
- yellow wire (power switch and clock backlight in eighth place in the block);
- if necessary, take the temperature sensor overboard and connect at least to the on-board computer;
- all cables must be additionally insulated.
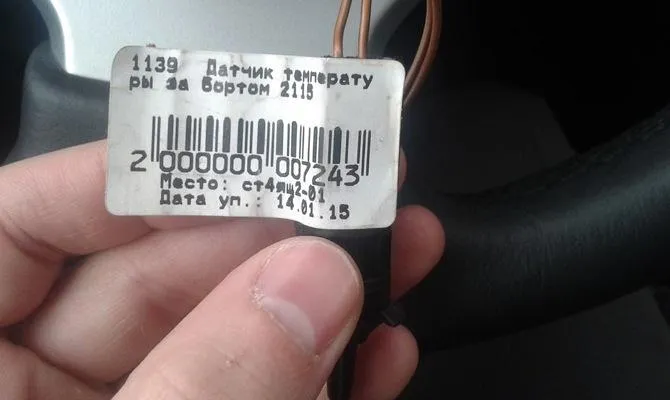
Temperature sensor overboard In order for the on-board computer to fit into the panel, it is necessary to cut out the upper part of the frame in which the radio is located – without this it will not be possible to place the radio and BC on the panel. You can also swap devices for better reading. After starting the engine, the computer should turn on. If this happens, then everything is connected correctly. According to the instructions, adjust the operating parameters of the device, select the backlight, fuel level, consumption, and so on.
It is worth noting that the installation of a BC in a car service will cost about 1000-2000 conditional units, depending on the region. Do it yourself and save.
